
This step-by-step guide explains how to attach a swing set to a playhouse. It focuses, specifically, on how to bracket and affix an existing swing frame to an existing playhouse structure.
I figured there are plenty of DIY guides out there showing how to build both these structures from scratch. But there aren’t as many resources for parents who just want to combine the two.
Say you’ve already got a super playhouse and you just want to buy a swing set and attach it to one side. It’s a relatively simple job.
All you need is some high-quality lumber, some framing brackets and a handful of galvanized bolts. And the swing set and playhouse, of course.
Table of Contents
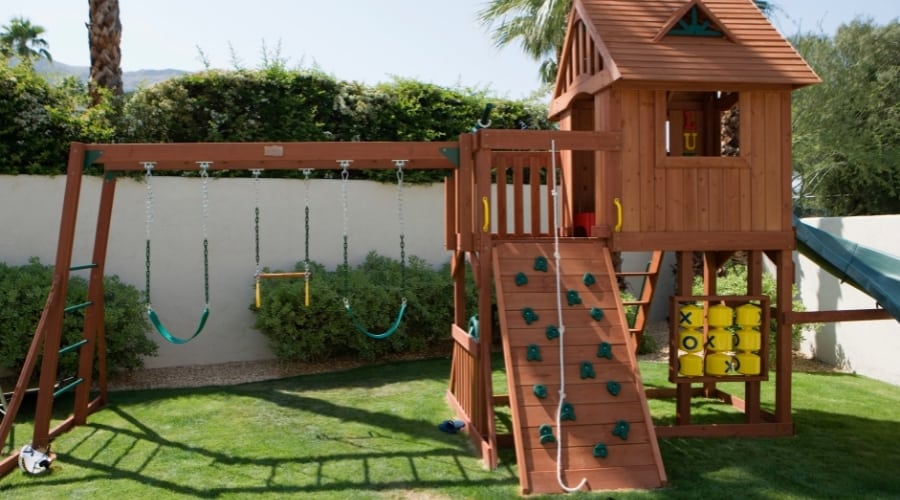
Attaching A Swing Set To A Playhouse
The first step is to remove the A-frame from one side of the swing set so that it is no longer freestanding. You’ll need a helper for this as the horizontal beam holding the swings up won’t have any support until you bracket it to the playhouse.
Use two galvanized framing brackets, one on either side of the playhouse rail, to affix the free end of the swing’s horizontal beam to the top of the rail.
Next, cut two 2x4s to the same height as the affixed horizontal beam. When they are stood vertically against the other vertical slats in the playhouse rail, they should be longer than these slats but line up with the highest part of the swing’s beam.
Bolt them in place at either side of the beam so that they form a snug fit around it. You can bolt these 2x4s directly on top of two existing rails. Or you can remove two playhouse rails and place your 2x4s in the same spot.
Then, cut a small piece of 2×2 to match the width from one of the vertical 2x4s to the other (making sure to measure from the sides farthest from the swing’s beam).
This small piece should rest on top of the vertical pieces to form a supportive frame around the beam’s exposed end.
The goal is to create an arch around the end of the horizontal beam that reinforces the point at which it attaches to your playhouse.
Steps To Attach Swing Set To Playhouse
Next, I’ll go into more detail using a playhouse measuring approximately 18 feet wide and 15 feet deep as a guide where relevant.
The width of your playhouse isn’t so important. You can attach the swing’s horizontal beam in the center of a raised rail or off center if you prefer.
Just leave enough room on either side for the arch-shaped support to be bolted over or in place of two slats.
Step 1 – Remove The Legs On One Side Of A-Frame Swing Set
Completely remove the A-frame from one side of the swing set so that it is no longer freestanding. You’ll need a helper to hold the swing set up while you undo any screws and remove the existing brackets.
You only want to remove the ‘legs’ from one side of the structure. This will leave it unable to stand up unaided. However, one end of the horizontal beam will be free to attach to your playhouse.
Step 2 – Adjust The Swing Set Height
Depending on the original height of your swing set, this could be easy or very tricky. The objective is to get the horizontal beam resting on (and supported by) the playhouse’s rail.
It should be perpendicular to the rail so that the rail holds the swing set up until you’ve got the opportunity to bolt all the pieces down.
This can only happen if the height of the swing set, from the underside of the beam, matches the height of the playhouse rail. You’ll know if it does because, if it doesn’t, the perpendicular beam will slant upwards or downwards when you position it on the rail and your swings will be wonky.
If the height is unsuitable, you’ll need to raise the swing set’s remaining A-frame by adding bolstering material to its base or removing some of its length with a saw.
If the height difference is significant, this could be an awkward task. I recommend having a helper support the loose end of the beam while you make any adjustments.
Keep it resting on the rail if you can – so your helper doesn’t have to bear the weight of the structure – but don’t forget it isn’t secured yet.
You’re not ready to bolt the beam down until the swing set is straight and level when its horizontal beam is resting on the playhouse rail.
Step 3 – Position The Swing Set Beam
At this point, the swing set is supported by the playhouse so it should be standing unaided. However, it is still unsecured.
Before you bolt the swing’s beam to the top of the rail, adjust its position so that its end is flush with the side of the rail that’s facing inwards (facing into the playhouse, not the side of the rail closest to the swings).
The quickest way to do this is to have one person up on the playhouse holding the unsecured end of the beam and another person on the ground moving the swing set closer or further as required.
Step 4 – Bolt The Swing Set Beam To The Playhouse Rail
Using galvanized framing brackets and bolts, attach the swing set’s beam to the rail in the position described. The beam doesn’t need to be absolutely central, it’s just the simplest way to do things.
If you want to attach the swing closer to the front or back of the playhouse, it’s achievable provided the beam is completely straight.
When it’s attached, there should be 90° angles on either side formed by the joining of the rail and beam.
I strongly advise using two brackets to create two attachment points on either side of the rail. Once the bolts are in place, the swing set should be attached to the playhouse though it’s necessary to add some additional support.
Step 5 – Create An Arch Support
The next step is to create a snug arch out of lumber that fits around the end of the swing’s beam. This will provide additional support by reinforcing the point at which the playhouse and swing set join together.
You’re going to need three pieces of wood. I recommend using two 2x4s for the sides of the arch and one smaller 2×2 piece for the top. Ideally, the 2x4s will be the same width as the vertical slats in your playhouse’s rail.
They don’t have to be for this to work but it keeps everything looking neat and professional. It’s up to you whether you want to cut them to the optimum width.
As for their length, the 2x4s should be long enough to line up with the highest point of the swing’s beam when positioned vertically on the deck like the existing rail slats. They will be longer than the others and extend past the horizontal rail.
To get the neatest, most secure fit, I would remove two of the rail slats so that they can be replaced with these longer pieces. You can bolt the longer pieces on top of two existing slats if you prefer but it might be harder to attach the brackets.
At this point, your swing’s beam should be snugly flanked by two vertical supports. The final piece is a small 2×2 that slots on top, resting flush with the horizontal beam and the vertical supports and closing the arch.
Bolt everything together securely for a safe, sturdy playhouse and swing set combo. Again, I recommend you add a framing bracket on either side to attach the arch to the beam in two places.
What Supplies Are Needed To Attach A Swing Set To A Playhouse
Lumber Needed
Cedar, redwood, spruce, fir and pine are all great choices of wood for a playhouse. These wood varieties are extremely strong and naturally resistant to rot and insect infestation. They should last for as long as your children need them.
The wood you decide to use will depend on what resources are available. One option is to match the wood used in your swing set’s original frame. This will help the construction look professional and visually cohesive.
As most of the wood you’ll need is already attached to the swing, just one 2×2 piece and two 2×4 pieces should be plenty. The price of the wood will vary depending on the variety you choose but it shouldn’t cost more than $30.
Another option is to save yourself some cash and source scrap lumber for the project.
Whatever type of timber you use, it will be stronger and more resilient if it has been pressure treated.
Tools Needed
- 25 x 6” 5/16 galvanized bolts
- 25 x 5/16 washers
- 25 x 5/16 nuts
- 8 x galvanized framing brackets
- Hammer
- Wood saw
- Drill with a long 5/16” bit
- ½- inch socket or wrench
- Tape measure
- Spirit level
This is probably more bolts, washers, nuts and brackets than you’ll need but these items are inexpensive. I find it’s always better to have more of these little pieces than you think you’ll need.
Technically, four framing brackets should be enough to tightly secure the swing’s horizontal beam to the playhouse rail.
However, as your swing set and playhouse are prefabricated structures, it’s best to use your own judgment and create additional attachment points if you feel they’re necessary for safety.
Helpful Things To Know When Attaching A Swing Set To A Playhouse
Here are some helpful things to consider when you’re preparing for and starting out on this project:
- Many hands make light work. This isn’t a complicated project but repositioning tall beams is tricky. Enlist a helper to support the swing set’s weight as you create those secure attachment points.
- Measure the height of the swing set and the playhouse before you start. That way, you already know if the swing’s horizontal beam is going to sit correctly on the rail. If it isn’t, you can decide to adjust the swing’s height before removing the A-frame. Once the frame is removed, the swing’s beam will need to be held up or supported in some way until it is bolted onto the rail.
- Use a spirit level to ensure the swing’s beam is completely straight and even. The smallest of tilts could make swinging difficult or uncomfortable so take some time to check your work before you permanently bolt things down.
- Buy timber planks that have been pressure treated for strength and durability. You might need to buy more than you need but having spare wood is not a disadvantage. If you create your support arch and still think the structure needs more reinforcement, you can attach a second arch to the beam on the other side of the playhouse rail.
Final Thoughts
I’ve tried to ensure the tips and advice in this guide apply to a broad audience. Fortunately, most children’s playhouses follow a similar shape and design so, even if your playhouse is much larger or smaller than the one in my example, you should be able to adapt the steps to fit.
This project is all about the perpendicular connection between the horizontal beam and playhouse rail. If it is level, straight and securely fastened, your swing set and playhouse combo should stand the test of time.