

So, you want to know how to attach a treehouse to a tree? It can be a challenging task if you don’t know what you’re doing. This guide is here to help.
In order to attach a treehouse to a tree, you must:
- Choose a mature tree in good health and prune tree limbs
- Use pressure treated framing materials & structural plywood
- Use correct TAB (treehouse attachment bolts) & brackets depending on tree size
- Drill multiple hole sizes into the tree
- Install TAB bolts into the tree
- Attach brackets to the underside of the beams
- Connect the wood frames to the tree
Treehouses are fun for all ages. Let’s face it, they make the best forts for kids, but adults can enjoy some alone time in a treehouse too.
If you have the space in your yard or on your property to build a treehouse, then you will make your family very happy. The most important part of the treehouse is the base and support system. This is why you need to know how to properly attach the treehouse to the tree.
This guide takes you through the steps of attaching your treehouse. There are specialized screws and bolts to use. It also matters which tree you pick.
The coolest treehouse is the safest treehouse, and this means secure and stable attachment to a tree. Using this guide, you will create a solid base for any treehouse. And, you can do it without upsetting the tree.
Table of Contents
Best Way To Attach A Treehouse To A Tree
Now that you have finally given into the begging of your children and are ready to build a treehouse, this is the place to start. Before you jump into building, you need to plan this project out.
For a safe and long-lasting treehouse, there are things you need to take care of first, before your start attaching wood to trees.
Step 1: Check Insurance Policy
The first thing to do is to contact your insurance company to make sure the treehouse will be covered as part of your home policy. There is always the potential for accidents and injuries with a treehouse, and each insurance company has different coverage options.
You should also plan to build low to the ground to reduce injuries. Any treehouse above 10 feet off the ground will be too high.
Step 2: Choose and Prune Tree
Next, you need to choose the right tree or trees. Find a mature tree that is in good health. You will need to have a hardwood tree such as an oak, maple, beech, or hemlock.
All dead leaders, branches and any other falling hazards need to be pruned and cleared away. If you want to double check the health of the tree to make sure it is clear of infection, you can always contact a local arborist.
Step 3: Use Treated Framing Materials and Structural Plywood
The materials you use are also important to the integrity of the treehouse. Use treated framing materials and structural plywood when you can.
Any cladding that you use needs to keep water out and protect against rot. You will also need to have the appropriate hardware which will be treehouse attachment bolts and brackets.
You also need to make sure you allow for the tree to grow. Just because you add a treehouse does not mean the life of the tree stops.
The trees will also sway in the wind, so you need to take that into consideration. The way you attach the tree house will need to accommodate any tree growth and movement.
It is important to avoid bolting any beams directly between thick trunks. Great pressure is created at the ground when winds move higher branches.
As a tree moves, thousands of pounds of force are created which can easily loosen bolts. If a bean is bolted between trees, there is an increased risk of bolts snapping during strong winds.
With this information tucked away, the best options you can choose include using a special bracket that allows for movement. You will also want to use treehouse attachment bolts.
These bolts are the best way for a tree to hold heavy loads. These bolts are very strong which means you need fewer of them for secure fastening. This is less damage to the tree.
Step 4: Install TABs
TABs (treehouse attachment bolt) need to be installed per the manufacturer recommendations. You should also never install these bolts in trees that have a diameter less than 12 inches.
To properly install a TAB to properly secure your treehouse to a tree, you will need the following equipment that can be found on Amazon:
- High torque drill
- Large ratchet / socket
- Torpedo level
- 3” self-feeding bit
- 1-1/8” x 17” auger bit
- Cheater pipe or socket
Step 5: Drill Holes
First, you will drill a large 3-inch hole and then a smaller and much deeper hole Make sure the holes are drilled level into the tree. Using a large ratchet and socket, you can thread the TAB into the tree at the pre-drilled holes.
You can also use a cheater bar to provide a little extra leverage. Attach a TAB nut to keep your brackets in place. To get the height of each TAB, you need to first determine the height of the floor for your treehouse. For additional tips on attaching TABs, watch this video.
Step 6: Install Brackets
The brackets need to be attached to the underside of the beams. They will slide over the perch of the TABs. You can also use temporary post supports to erect band joists. The brackets slide over the TABs and are attached to the beams.
There will be room for tree movement. Any joists are fastened using metal joist hangers. Your support beams can be supported by concrete pier footings as well.
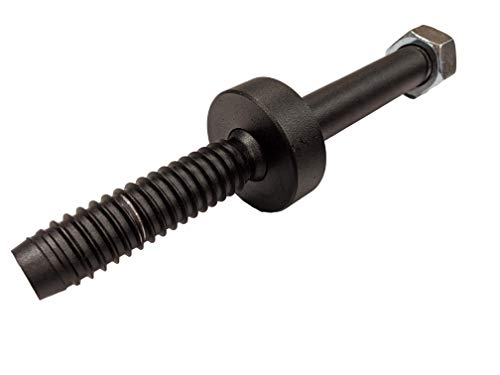
Treehouse Attachment Bolts
Treehouse attachment bolts, or TABs, are specialized bolts that are designed for treehouse construction and attachment.
Their design is based on the concept that load needs to be distributed to a greater area at the point where the bolt exits the tree. TABs can sustain loads of 2000 pounds and more.
TABs are typically made from two pieces of steel. They have four sections.
- A coarsely threaded end which secures the TAB to the tree
- A boss, which is thicker and provides strength and greater load distribution
- An arm that extends outward to support beams
- A short-threaded section at the end of the arm which accommodates a K-nut
TABs are frequently used to perch the beams of a treehouse away from the tree surface. This lets the tree grow without being restricted. They will not cause lasting harm to a tree.
Because trees grow upwards from the tips and not the base, the TABS will always remain in place at the same height. Trees do grow in girth, but TABs are designed to accommodate this.
To see specifically how TABs are used to attach a treehouse, watch this video.
When you are ready to buy the Treehouse Attachment Bolts for your project, there are various different models, shapes, and sizes. The most commonly used include:
- 1.25"x6" perch treehouse attachment bolt(TAB)
- Quantity (1) 3"x1" collar
- Made from hardened heat treated 4140 Steel
- Textured black powder coat finish
- Includes 1.25-12 zinc plated hex nut(uses 1-7/8" socket)
Last update on 2024-04-26 / Affiliate links / Images from Amazon Product Advertising API
- SL TAB: The Standard Limb TAB is made from carbon steel and is tree friendly. It allows the tree to grow around the bolt. This ends up giving you a much stronger and secure attachment over time. When properly installed an SL TAB can support between 8,000 and 10,000 pounds. Standard boss length for the SL TAB is 6” x 3”. It is important to note that if you are not going to use a suspension system with the SL TAB, then you need to get a hex nut to place at the end of the TAB.
- HL TAB: The Heavy Limb TAB is bigger and bolder. It has a 1 ¾” heat treated steel body and a steel boss that is hydraulically pressed on. It can support a load three times greater than the SL TAB. This TAB is also tree-friendly when properly installed and will be used for serious treehouse projects.
- Mini TAB: This is the lighter duty version of the SL TAB. These are typically used as back-up support for the SL TABs. They have a smaller 2” x 4” boss and are only 9” long. They can also be used to attach stairs.
- Short TAB: This shorter TAB is often called a “stubby” and is used in the same way as a SL TAB In some cases a longer TAB does not work, and this will be your next option. These are also great for attaching bridges and as a back-up to regular TABs on larger treehouses.
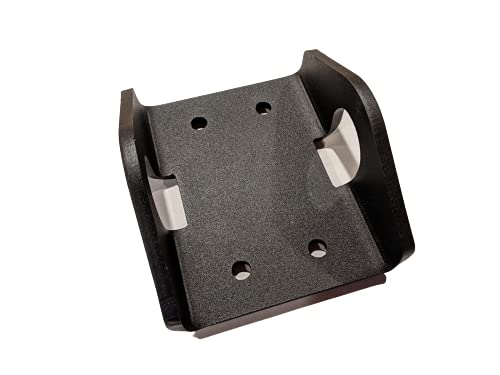
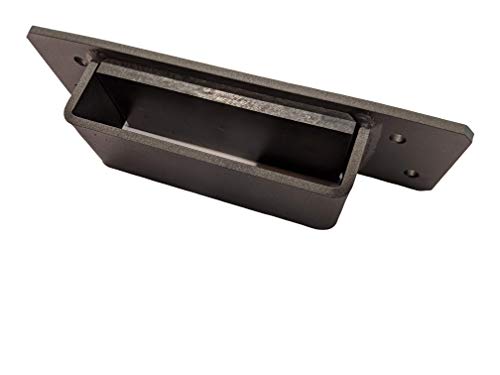
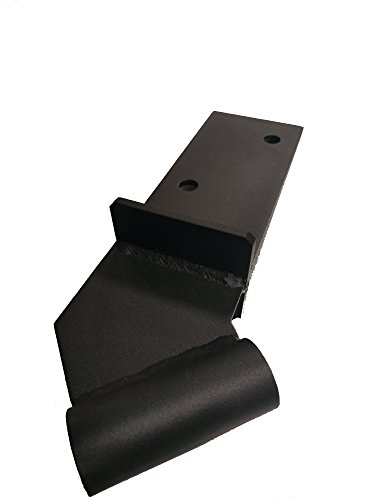
Treehouse Attachment Bracket
Treehouse attachment brackets are specialized screw mountings designed to work with TABs. The combined use of these is thought to be the best way to attach a treehouse to a tree.
Just as with TABs, there are different brackets you can use. The bracket you use will be based on the TAB or lag bolt as not every bracket works with all TABs.
The most commonly used treehouse attachment brackets include:
- Pipe Bracket: These brackets allow movement in one direction only. They are attached to the TAB and to lag bolts. These are great for attaching a beam to the top of a treehouse fastener. The lag bolts then attach the bracket to the beam. These are typically made from steel and have a powder coat finish. You can get 1-inch pipe brackets that will only work with lag bolts or a 1.25” version that works with TABs that are 12”.
- 1/4" Formed Steel Plate
- Bracket surrounds the Lag Bolt or TAB in two locations
- Tough, corrosion resistant, textured powdercoat finish
- Does not include TABs or lag bolt
Last update on 2024-04-26 / Affiliate links / Images from Amazon Product Advertising API
- Pipe Suspension Bracket: These are typically 1.25” and will only work with a TAB or a lag bolt measuring 1.25”. These brackets are used for cabling from a higher point in the tree. These are also made from steel and have a powder coat finish.
- Floating Bracket: The floating bracket measures at 1.25” and is ideal for connecting treehouses to multiple trees. This is the ideal bracket when you need to allow for possible tree movement. These steel brackets also have UHMW plastic which eliminates friction between the bolt and the bracket. There will be less creaking during windy days. The floating bracket only works with TABs that are 1×9, 3×9, or 6×12. You can also use 1.25” x 15” lag bolts with this bracket.
- Made for 1.25"x15" Lag bolts or 1.25" TABs
- Uses 1/2" UHMW for bearing surface
- Nice corrosion resistant textured black powder coat finish
Last update on 2024-04-26 / Affiliate links / Images from Amazon Product Advertising API
- Knee Brace Bracket: The knee brace bracket is used when you need to attach a wooden knee brace to the TAB. Some people prefer to put a board at either side to sandwich the bracket, but a solid brace creates a better hold. Simply cut a notch in the center of your brace and fit this bracket to the wood in the middle. These usually come with the additional hardware you will need such as carriage bolts with nuts and lock washers. You can get this in 1-inch size which works with a 1” lag bolt or as 1.25” that will work with a 1.25” lag bolt or TAB.
- 1/4" Steel Plates
- Tough, corrosion resistant, textured powdercoat finish
- Includes (2) 5/8"x5" hot dipped galvanized carriage bolts, washers, lock washers, and nuts
- 1" Pipe - 1.125" Inside diameter(ID)
- Shipping only to 48 contiguous US
Last update on 2024-04-26 / Affiliate links / Images from Amazon Product Advertising API
Best Screws For Trees
One of the main concerns about attaching a treehouse to a tree is the safety of the tree. Can you safely drill into a tree without harming it?
Even if you find a sturdy tree, will it be able to handle the damage? If you are conscious about the nails or screws you use, you can avoid serious long-term damage to the trees.
When it comes to the best screws to use, making sure they do not rust needs to be a top priority. This means you need to choose aluminum, stainless steel, or any other rust-proof material for your screws.
You also want to make sure that you do not use the hammer more than necessary. Plan where nails and screws need to go, because creating too many holes puts more stress on the tree.
How To Attach A Treehouse To Two Trees
If you decide that you want to attach your treehouse to two trees, there are a few different steps to perform. Two trees are ideal for treehouse building, as they provide much more support and stability.
Again, you need to choose the right trees. You also need to make sure they are close enough together and relatively equal in height and width.
Step 1: Measure
Measure up each tree to mark the distance from the ground that you want your treehouse to be. Ideally, you want to find trees that have branches that separate into a “V” shape.
This branching will provide extra support by giving you four anchor points instead of two. At these four locations, you need to pre-drill the tree. On each side of the “V” drill ⅜” into each prong, keeping all the holes level.
Measure the distance between the holes at each side. Subtract this measurement from ten feet and halve the rest. Mark the distance from one end of the wood planks (these can be 2×10 or 2×12) you have.
Mark the other end with the original measurement between the holes. This keeps the wooden planks centered so they can bear equal weight.
Step 2: Create Slots
Create a slot that is 4” at each of the marks on your wood. This allows trees to sway without damaging the integrity of the treehouse. To do this, drill two ⅝” holes 2 inches away from either side of the mark you made. Using a jigsaw, cut between the holes to make the 4-inch slot.
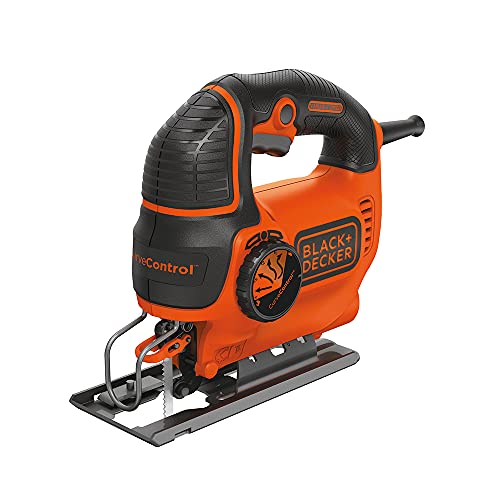
- HIGH PERFORMANCE ELECTRIC JIG SAW - 5 amp electric jig saw with a 3⁄4” blade orbital action for increased precision
- CURVE CONTROL TECHNOLOGY - Four curve settings for maximum control over rounded cuts
- BEVELED CUTS - Makes beveled cuts up to 45 degrees
- HIGH POWER - Variable-speed motor generates up to 3,000 SPM of cutting power
- ADJUSTABLE SHOE - Adjustable shoe with wire guard for enhanced stability and line of site
Last update on 2024-04-26 / Affiliate links / Images from Amazon Product Advertising API
Step 3: Mount Main Supports
It is time to mount two of the main supports to the tree at the desired height. Take two of your wood planks and place them against the tree.
Using a wrench, you are going to drive in four 6 or 8-inch-long (⅝” diameter) galvanized lag screws into the slots you created.
Make sure you put washers between the screws and the wood. Make sure both planks are flush with each other and at an equal height.
Step 4: Pre-Drill Wood
Pre-drill the wood before installing the screws to make it easier to drive them in. You can also use two planks at each support location for added strength.
If you do this, make sure you use the larger 8” screws to connect them to the tree. Undercut both of the planks before mounting them so they will be more aesthetically appealing.
Step 5: Install Smaller Planks
Next, take 4 smaller planks of wood, typically 2×6 and space them evenly across the main supports you just mounted. Place them on their side rather than flat and secure them in place with 3” deck screws.

- TYPE 304 (18-8) GRADE 3 INCH STAINLESS STEEL CONSTRUCTION SCREWS for Decking, Fencing and general-purpose woodwork.
- RECOMMENDED for use in all COASTAL, WET and OUTDOOR applications, including decks, balustrades, fences, jetties, walkways and general construction work.
- HIGH CORROSION RESISTANCE means no more ugly rust stains on your beautiful outdoor timber structures.
- SUITABLE for use with all HARDWOOD, SOFTWOODS and PRESSURE TREATED lumber, including Redwood and Cedar.
- STAR DRIVE HEAD, Torx Driver Included. TYPE 17 POINT for easy driving (pilot holes recommended) . NIBS under the head help seat the screw. BURNISHED finish. Note that these are not self drilling screws.
Last update on 2024-04-26 / Affiliate links / Images from Amazon Product Advertising API
Take 2 more 2×6 boards and lay them flush across the four ends and nail them in position. You should now have a square attached to your two main supports.
Step 6: Use Rafter Ties
This is the base for the platform of your treehouse. You will use galvanized rafter ties to secure the main supports. The middle of their platform will be secured using joist hangers and you will use 2×4 boards to brace the platform.
Cut a 45-degree angle from the tops of each of the 2×4 boards. Make a “V” with these. They should overlap at a straight part of the tree.
Attach the bracing top to the platform using nails from below and inside. Lag screws will be used to stabilize the 2x4s at a sturdy section of the tree.
How To Attach A Treehouse To A Tree Without Hurting The Tree
Drilling a screw or hammering a nail into a tree is going to leave a wound. What you can do is work consciously so you can avoid serious injury and long-term damage to the tree.
The placement of the screw or nail does not matter as much as the health of the tree. This not only impacts the stability of your treehouse but will affect how damaged the tree gets.
Healthier trees will be tough, and they will begin to compartmentalize once you drill into them. This means they naturally start healing to protect the rest of the tree.
A stronger tree will be better able to withstand damage done by nails and screws. Avoid smaller trees and any that have been weakened by weather or internal damage such as infection.
With the right tree and rust-proof nails and screws, you can attach a treehouse without causing serious damage to the tree. These are the steps to follow to keep your tree happy and healthy.
Step 1: Platform Base
Using exterior plywood for the platform base, you will place these to sit on the tree’s main branches. The location needs to be centered around the trunk.
Leave space for trunk growth. You will not be attaching the treehouse to the trunk. It will attach to the main branches which are stable.
This causes less damage to the tree. Always leave an area in the floor and wall for the trunk to come through.
Step 2: Attach Bolts
Do not wedge planks between branches. Instead, attach bolts to the outside of the floor near to any tree limbs. Wrap some rope around the branches a few times and then through the eye bolts.
Make a secure knot. You will want to use at least 2 bolts under the floor of the treehouse for a more secure attachment.
Step 3: Attach Walls With Eye Bolts & Rope
You will attach the walls of the treehouse in the same way, using eye bolts and rope. Use at least one bolt for each branch and one for each wall. You can also use nylon straps to hang and provide further support for the treehouse.
Another method to secure a treehouse to a tree without harming the tree is the Tadashi Kawamata method. This involves wrapping rubber sheath around the branches of the tree.
You then use ratcheting straps to attach the wood planks and beams to the branches. This is used on tree huts in Madison Square Park and protects the bark from being worn.

- Ratchet Strap Kit – This Set of ratchet tie down straps includes 4 metal ratchet buckles with rubber grips, 4 soft loops straps, 4 heavy-duty S-Hook Straps. The straps are 1 inch wide and 15 feet long. Everything fits inside a carrying pouch.
- Safe & Secure – Ratchet straps heavy duty S hooks and soft loops straps help create tie down anchor points to strap items to cars, SUVs and trucks. Ergonomic rubber grip handles make it easier to hold while ratcheting to secure your loads safely during transport.
- Durability – Rubber coated stainless steel handles with a smooth, simple release latch. The S hooks are coated for added weather resistance. Altogether along with high quality green polyester net webbing, straps have a working load capacity of 550lb and 1650lb break strength.
- Multifunctional – Tie down straps ratchet mechanism offers durability and security to transport a variety of objects. Securely tie down your motorcycle, bike, kayak, UTV, boat, ATV, boxes, boat, cooler, & other cargo via trailers, or car roof rack.
- One Year Warranty- Enjoy your motorcycle tie down straps for a year while traveling, kayaking, boating, and moving with peace of mind. Your retractable tiedowns are covered for a full year!
Last update on 2024-04-26 / Affiliate links / Images from Amazon Product Advertising API
If you are interested in building a freestanding treehouse, check out my article How To Build A Backyard Treehouse Without Trees.
Helpful Tips When Considering How To Attach A Treehouse To A Tree
Attaching a treehouse to a tree is a fundamental step to treehouse building. Without a secure attachment to the trees, the treehouse can be unsafe.
You now have the guide to help you get your treehouse attached properly and safely. There are just a few additional tips to keep in mind.
- Find the right tree. A sick or infected tree will not provide the right support.
- Measure everything first. You need to make sure you know where you will be drilling and if everything will be even.
- Make sure you have support beams and the additional hardware needed for these.
- Always use hardware that will not rust. This protects the tree and the integrity of the treehouse.
Final Thoughts
A treehouse can bring a lot of joy, fun, and peace. There is something to be said for having a private little fort up in the trees, away from the world.
If it is time to put a treehouse in your yard, then you need to make sure safety comes first. This means knowing how to attach a treehouse to a tree properly.
This guide will help you achieve just that, so you can create the perfect little home away from home.